Tin Can Sandwich Bread

About two years ago, we had just returned from our trip to Montana and I was raving about the Clubfoot sandwiches (TM) at The Staggering Ox.
These overstuffed, oddly shaped sandwiches were one of the highlights of the visit to Big Sky Country. And that’s saying a lot for a vacation that included wild adventures in Glacier National Park!
Basically the love child of a burrito and a hoagie, these sandwiches owed a lot to the freshly baked cylindrical loaves that hold everything together.

Now I’ve cracked the code on how to make this tin can sandwich bread at home. (The Clubfoot name is in fact trademarked, so we’ll choose just to be very descriptive about the name.)
At the Ox, the bread comes in a bunch of flavors, like garlic parmesan, jalapeño cheddar, asiago, and dill.
And the filling and homemade sauce options are equally overwhelming. Honestly, the mix and match options at this joint are nearly endless and I cannot imagine how many permutations are possible.

But for our purposes, we’re going with a garlic-rosemary tin can sandwich bread.
To bake the bread, you’ll need 4 clean and empty 28-ounce tomato cans. Whether you’ve previously needed them for peeled, crushed, or diced tomatoes, it doesn’t matter.
Just use your ‘maters, peel off the labels, and wash the cans well.

I find it easier to make four loaves of tin can sandwich bread at a time, even if the sandwiches themselves are so hearty that they could fill you up for both lunch and dinner. (What can I say? I love a big old sandwich.)
The loaves themselves are easy to freeze for future sandwiches, so in the vein of cooking once and eating twice, I find it a sound strategy.
The bread recipe itself is based on the Sandwich Bread 101 recipe from the King Arthur Flour Baker’s Companion cookbook, an indispensable resource for bakers of any skill level.

But with sturdier bread and white whole wheat flours, these cylinders have more structure than a sandwich loaf while maintaining a tender crumb.
If you don’t have either type of flour, you can substitute all-purpose, but your loaves will be a little softer.
(And if you’re a King Arthur superfan and want to substitute their pizza dough flavor for the garlic powder, I highly recommend that as well.)

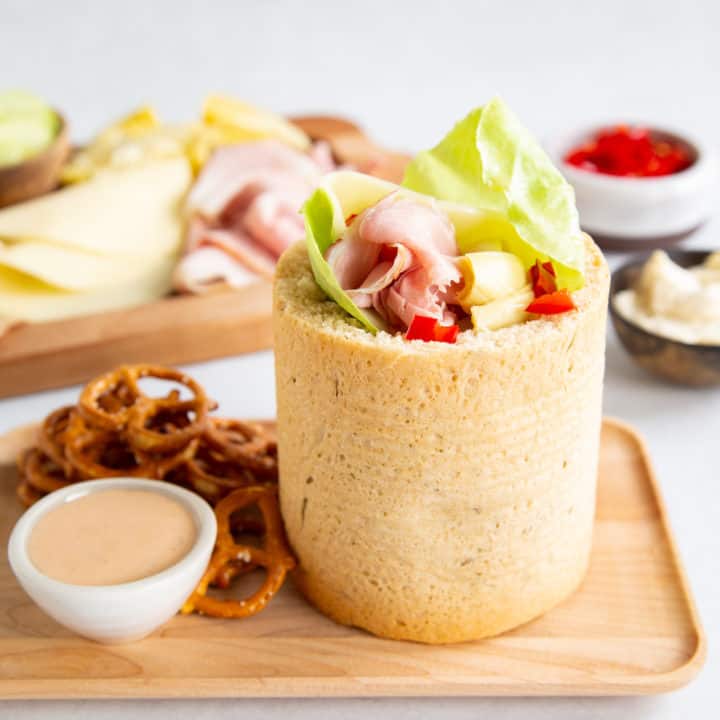
Once you have your tin can sandwich bread baked and ready to fill, the (big) sky is truly the limit. Traditional or imaginative? Totally up to you.
My personal current favorite is smoked ham, artichoke hearts, butter lettuce, provolone, hot pickled peppers, and garlic cream cheese.
My husband, ever the traditionalist, goes for smoked turkey, provolone or muenster, lettuce, roasted red peppers, and ranch dressing. He’ll spice it up with a little chipotle ranch if we’ve got it, though!

Tin Can Sandwich Bread
Tin can sandwich bread is made in—you guessed it—clean tomato cans for unusually shaped sandwiches that are fun to fill with your favorite ingredients.
Ingredients
- 4 1/2 cups (540 grams) bread flour
- 1 1/2 cups 180 grams whole wheat flour
- 2/3 cup (42 grams) potato flakes
- 1/2 cup (70 grams) nonfat dry milk
- 1/4 cup (50 grams) granulated sugar
- 2 tablespoons minced fresh rosemary
- 2 tablespoons (18 grams) garlic powder
- 1 tablespoon (12 grams) instant yeast
- 2 teaspoons (12 grams) kosher salt
- 8 tablespoons (1 stick) unsalted butter, cubed and softened
- 2 cups warm—not hot—water
- cooking spray
- fillings of your choice
Instructions
To make the tin can sandwich bread loaves:
- Add both flours, potato flakes, dry milk, sugar, rosemary, garlic powder, yeast, and salt to the bowl of a stand mixer. Stir a few times just to combine.
- Add the butter to the bowl.
- Using the dough hook attachment on medium low, drizzle in the water until a shaggy dough forms.
- Continue to mix for about 3 minutes more in the stand mixer until the dough is soft and smooth.
- Alternatively, you can mix and knead the dough by hand.
- Spritz a clean bowl with cooking spray and transfer the dough to the bowl. Cover and let rest for 1 hour until the dough has nearly doubled in size.
- Spritz 4 clean 28-ounce tin (aluminum) cans with cooking spray.
- Divide the dough into 4 pieces and shape into balls.
- Place 1 dough ball in each can, then cover and let rise for about 1 1/2 hours, until the dough has risen to fill the can. I find it easiest to place all the cans on a small baking sheet and cover them as a group with a cotton towel.
- Preheat the oven to 350 degrees F.
- Uncover the cans and space apart on the baking sheet, if using. Bake for about 30 minutes until golden brown and domed, and a thermometer inserted into the bread reads 190 degrees.
- Carefully remove the bread from the cans and cool on a rack.
To make and fill the sandwiches:
- Place a loaf of bread horizontally on a cutting board and carefully slice off the domed top with a small serrated knife.
- Turn it upright and use the knife to cut a circle through the center of the bread about 3/4 inch inside the edge of the cylinder, making sure not to cut the entire way through to the bottom of the loaf.
- Use your hands to pull chunks of bread out of the center of the loaf and hollow it out. Save the top and chunks and toast them up for croutons. They're fantastic on corn chowder!
- After much trial and error, I've determined that this is my favorite method of filling the sandwich so you get equal amounts of ingredient in almost every bite:
- Spread the inside walls of the sandwich with your preferred sauce, dressing, or cream cheese.
- Place 1 or 2 slices of cheese around the walls.
- On your cutting board, you can create a "roll-up" style filling with meats, lettuce, and vegetables and then stuff it inside the cheese layer.
- Or you can layer ingredients one at a time inside the bread for a more sedimentary approach. Your call.
- Serve additional sauce on the side for drizzling as desired.
Recommended Products
As an Amazon Associate and member of other affiliate programs, I earn from qualifying purchases.

Nutrition Information:
Yield: 4 Serving Size: 1Amount Per Serving: Calories: 905Total Fat: 26gSaturated Fat: 15gTrans Fat: 1gUnsaturated Fat: 8gCholesterol: 63mgSodium: 524mgCarbohydrates: 145gFiber: 9gSugar: 5gProtein: 24g
The nutritional information above is computer-generated and only an estimate.
FTC Disclosure: As an Amazon Associate, I earn from qualifying purchases. Good Food Stories LLC receives a minuscule commission on all purchases made through Amazon links in our posts.

Casey Barber
Casey Barber is the owner and founder of Good Food Stories LLC and a visual storyteller whose work often focuses on the intersection of food and culture. She is also the author of the cookbooks Pierogi Love: New Takes on an Old-World Comfort Food and Classic Snacks Made from Scratch: 70 Homemade Versions of Your Favorite Brand-Name Treats, and she couldn’t get anything done without the help of her executive assistant cats, Bixby and Lenny. Her favorite color is obviously orange.


