Ethiopian Dessert Pierogies: A Cross-Cultural Treat

As part of my travels around the country promoting Pierogi Love: New Takes on an Old-World Comfort Food over the past few months, I’ve had a blast talking with fellow pierogi obsessives and new pierogi lovers alike about the charms of the humble (but versatile!) Eastern European dumpling.
Speaking with other cooks of all skill levels, it’s been fascinating to see how the language of pierogies can easily be translated and incorporated into the culinary traditions of many cultures.
And it’s not surprising that in Chicago, an already pierogi-obsessed town, that I was introduced to a whole new way to give pierogies an international spin: Ethiopian destaye dessert pierogies.

Specifically, I had the opportunity to meet Almaz Yigizaw, chef and owner of the renowned Chicago restaurant Ethiopian Diamond, and teach her how to make pierogies using a number of traditional Ethiopian dishes.
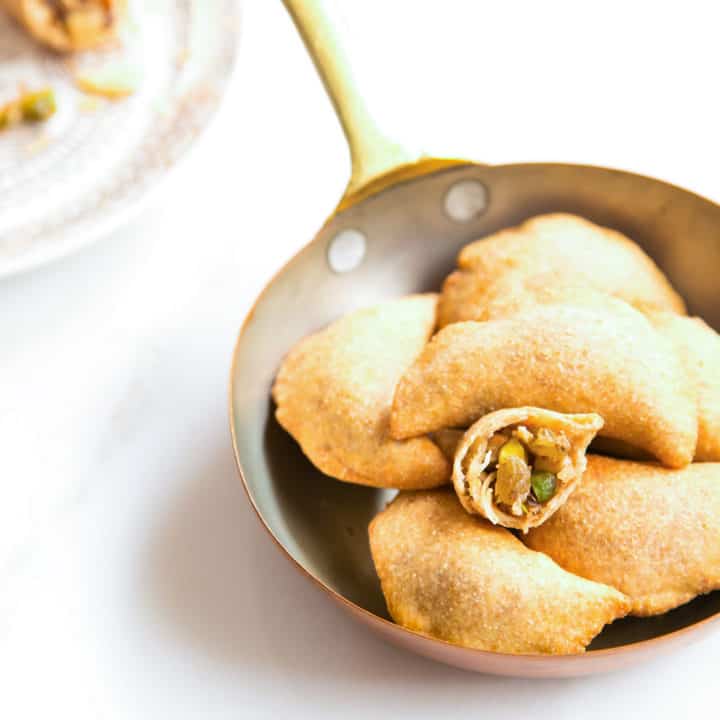
Almaz prepared a smorgasbord of fillings from berbere-spiced chicken to simple sautéed lentils, but my favorite of the group was a sweet and aromatic muesli-like blend.
Her menu includes a house-made version of the traditional fried pastries known as destaye, an Amharic word which translates to “my happiness” and a fitting term for an end-of-meal treat.

Chef Almaz’ triangular pastry shells are filled with a cardamom-scented mixture of coconut, raisins, and nuts that also makes for an unexpected pierogi filling.
For pierogi beginners, this is a great “training wheels” filling when you’re just getting familiar with the pierogi-folding process.
Unlike squishy, oozy fillings like juicy fruit or saucy pulled pork, this dry mix won’t destroy the seal on the pierogi if some of it falls out when you’re pinching the edges together.

(For savory pierogi fans, my beloved reuben pierogi filling works the same way.)
Sidenote: speaking of muesli, you may want to make a double batch of the filling from the recipe below just so you can stir spoonfuls into yogurt for breakfast. With a splash of maple syrup and a handful of toasted amaranth seeds, it’s my new favorite way to start the day.
Though destaye are traditionally deep-fried, these Ethiopian destaye dessert pierogies (being pierogies) taste equally wonderful when boiled and tossed in melted butter.

And if you’re not into the delicately sweet oat dough that accompanies this filling, feel free to replace it with the basic sweet dough in my sour cherry pierogi recipe as well.
Either dough option is a winner with this wonderfully spiced and nutty filling.
I knew when I wrote Pierogi Love that there were far more ways we could keep expanding the repertoire of the simple pierogi beyond the 60 recipes I was able to include in the book. (Deadlines, schmedlines, as I like to say.)
And as cliché as it sounds, it’s been a true bonding experience to see how the pierogi fits into the cooking traditions of everyone I’ve met and spoken with since the book has made its way into the world.
Who knows what international friends pierogies will hook up with next?

Buy Pierogi Love:
- Amazon
- Barnes & Noble
- Bookshop
- Indigo (for Canadian readers)
Ethiopian Destaye Dessert Pierogies
Pierogies filled with a mix of nuts, coconut, and spices are inspired by the Ethiopian dessert pastries known as destaye.
Ingredients
Pierogi Filling
- 1 ounce (about 1/2 cup) shredded unsweetened coconut
- 1 1/2 ounces (about 1/4 cup) shelled whole pistachios
- 1 ounce (about 1/3 cup) sliced almonds
- 1 1/2 ounces (about 1/4 cup) raisins—regular, golden, or a mix
- 1 tablespoon unsalted butter
- 1 tablespoon dark brown sugar
- 1/2 teaspoon ground cardamom
- 1 pinch kosher salt
Oat Dough
- 1 large egg
- 1/2 cup (4 ounces; 113 grams) plain Greek yogurt (any fat percentage)
- 3 tablespoons (1 1/2 ounces; 43 grams) unsalted butter, melted and slightly cooled
- 1 tablespoon granulated sugar
- 1/4 teaspoon kosher salt
- 1 1/4 cups (4 1/4 ounces; 120 grams) oat flour
- 1 cup (4 1/4 ounces; 120 grams) unbleached all-purpose flour
Egg Wash
- 1 large egg
- 1 tablespoon water
Instructions
Make the filling:
- Toast the coconut in a large skillet over low heat, stirring and shaking the pan frequently and watching carefully as the shreds darken from off-white to pale beige. Remove the pan from the heat as soon as you see spots where the coconut is turning mahogany brown.
- Pour the coconut into the bowl of a mini food processor.
- Add the pistachios and almonds to the pan and return to low heat. Toast the nuts, again stirring and shaking the pan to get equal heat distribution.
- As soon as the almonds get a bit of brown on them and you can smell the toastiness in the pan, remove from the heat and add the nuts to the mini food processor.
- Add the raisins to the mini food processor. Pulse a few times to coarsely chop the nuts and raisins.
- Put that skillet back over low heat and melt the butter.
- Add the brown sugar and cardamom and stir continuously until the sugar dissolves into a granular liquid, about 1 minute.
- Pour the chopped-up contents of the food processor back into the skillet and stir to coat evenly with the spiced sugar.
- Remove from the heat one last time, scrape the filling into a bowl and let cool to room temperature.
Make the dough:
- Whisk 1 egg, yogurt, butter, sugar, and salt in a bowl.
- Whisk the oat and all-purpose flours together in a large bowl.
- Gently stir the wet ingredients into the flour. The dough will initially be very dry and shaggy, seeming as if it will never come together, but have no fear: Keep stirring, and it will pull itself into shape.
- Once the dough starts to come together, press and smash it against the sides of the bowl with your palms, picking up dough bits and essentially kneading it within the bowl until it forms a ball.
- Tip the dough and any remaining shaggy flakes out onto a clean work surface. Knead until smooth, about 1 minute.
- Cover the dough with the bowl and let rest 15 minutes.
- Make an egg wash by whisking the remaining egg and water in a small bowl.
Assemble the pierogies:
- Line a rimmed baking sheet with waxed paper.
- Divide the rested dough into 4 equal pieces. Set aside 3 dough pieces and cover with the mixing bowl.
- Roll the remaining dough as thinly as possible into a rough 8- by 12-inch rectangle.
- Using a 3-inch round cookie cutter, cut out 6 rounds of dough. If the dough isn't quartered evenly, you may get 5 rounds from one piece and 7 from another. Resist the temptation to re-roll dough scraps for additional rounds. It seems wasteful, but the dough won't be as tender the second time around.
- Place 1 teaspoon filling into the center of each dough round. Using your finger, swipe a very scant amount of egg wash—just a light touch—around the dough edge.
- Fold into a half-moon shape: Either fold the dough over the filling on the work surface—I call this "the blanket"—or gently cup the pierogi in your hand in a U shape—I call this "the taco."
- Gently but firmly seal the pierogi by pinching and squeezing the edges together with your thumb and pointer finger. Start with one pinch at the top, then move to one "corner" of the pierogi and pinch along the edge back to the top. Repeat on the opposite side to finish sealing the pierogi.
- Transfer to the baking sheet and repeat with remaining dough rounds and filling.
Cook the pierogies:
- To boil and pan-fry fresh or frozen pierogies, bring a large pot of water to a boil over medium-high heat.
- Add pierogies and cook until floating, about 2 to 3 minutes for fresh and 4 to 5 minutes for frozen. Drain well.
- Meanwhile, melt 1 tablespoon unsalted butter in a skillet over medium heat. Add as many pierogies as will fit in the skillet in a single layer without crowding.
- Cook until pierogies are brown and crispy, about 2 minutes per side. Repeat with additional butter and pierogies.
- To deep-fry fresh or frozen pierogies, use an electric deep fryer or a large, high-sided pot filled with at least 2 inches of vegetable or canola oil (fill the pot no more than 1/3 full).
- Heat oil to 350 degrees.
- Add pierogies and cook until golden brown, about 3 minutes for fresh and 5 minutes for frozen—frying time may vary based on your equipment.
Notes
Filling can be made up to 1 week ahead. Store in an airtight container at room temperature.
Pierogies can be frozen for up to 3 months before cooking.
Recommended Products
As an Amazon Associate and member of other affiliate programs, I earn from qualifying purchases.


Nutrition Information:
Yield: 4 Serving Size: 1Amount Per Serving: Calories: 468Total Fat: 18gSaturated Fat: 11gTrans Fat: 0gUnsaturated Fat: 6gCholesterol: 125mgSodium: 284mgCarbohydrates: 62gFiber: 3gSugar: 7gProtein: 13g
The nutritional information above is computer-generated and only an estimate.
FTC Disclosure: As an Amazon Associate, I earn from qualifying purchases. Good Food Stories LLC receives a minuscule commission on all purchases made through Amazon links in our posts.

Casey Barber
Casey Barber is the owner and founder of Good Food Stories LLC and a visual storyteller whose work often focuses on the intersection of food and culture. She is also the author of the cookbooks Pierogi Love: New Takes on an Old-World Comfort Food and Classic Snacks Made from Scratch: 70 Homemade Versions of Your Favorite Brand-Name Treats, and she couldn’t get anything done without the help of her executive assistant cats, Bixby and Lenny. Her favorite color is obviously orange.


